Building an Arm-based Homelab Server with Ampere Altra
Until last year, I’ve been running all of my self-hosted services on an older 2U server powered by an Intel Xeon Silver 4214 CPU and a Supermicro X11SPM-TPF motherboard. The server was reasonably powerful but very loud and power hungry (averaging 134W). I wanted to replace it with something less power hungry and quieter fans, so I built a new homelab server with a 64 core Ampere Altra Arm CPU and the ASRock ALTRAD8UD-1L2T motherboard.
A while back, I read on ServerTheHome about the new Ampere Altra Arm processors and ASRock motherboards, so I wanted to use Arm instead of Intel/AMD x64 for my next build. Arm is usually less power hungry, and I had good experiences with the Ampere-based cloud server on Hetzner.
Building
I settled on the following build:
- Motherboard: ASRock ALTRAD8UD-1L2T (“Deep” Micro-ATX, PCIe 4.0, up to 2TB RAM)
- CPU: Ampere Altra Q64-22 (64 cores at 2.2 GHz, TDP 69W)
- CPU Cooler: Arctic Freezer 4U-M
- RAM: 6x Hynix 32GB (DDR4, 2666MHz)
- PSU: Corsair RM750e (ATX, 750W)
- Storage: SK hynix Platinum P41 (PCIe 4.0, 1TB)
- GPU: Nvidia RTX A4000 (16GB VRAM)
- Case: Sliger CX4150a (4U, 15”/38cm deep)
- Case Fans: 3x Arctic P12 Max
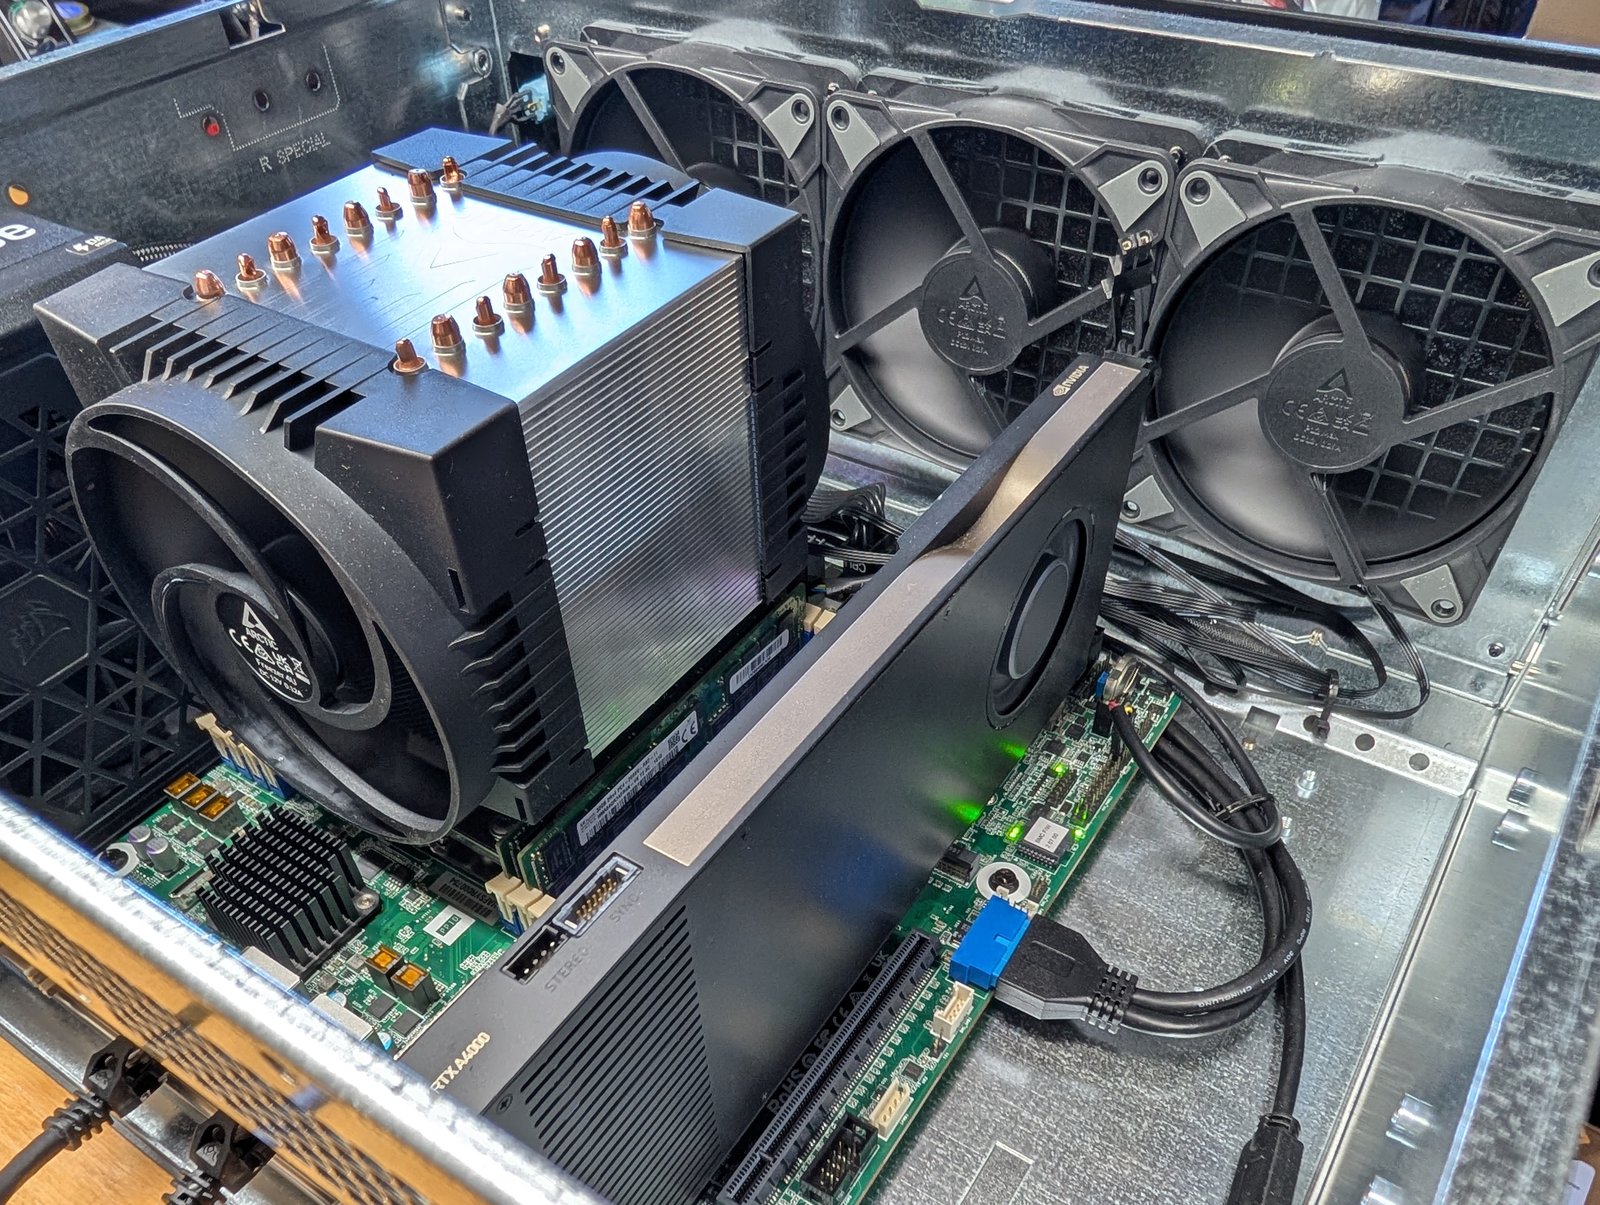
The ASRock motherboard is pretty much the only Ampere motherboard available right now and while expensive, it has some cool features: 4 full-size PCIe 4.0 x16 slots, 8 DDR4 RAM slots, and 10GbE networking. Also, Newegg sells a bundle with the motherboard and CPU. This is great because Ampere-based systems are usually not easily available to consumers. For the cooler and case fans, I went with Arctic instead of Noctua because they were significantly cheaper and also very quiet. For the LGA 4926 socket, I could only find 2U passive and 4U active coolers available for purchase. The 4U cooler is clearly an overkill for a 70W TDP CPU, but it keeps the CPU below 40 degrees C even under heavy load. The motherboard has support for 3200 MHz DDR4 RAM but I had some 2666 MHz DDR4 RAM from my last build, so I just used that. For the case I went with the Sliger case because I wanted (1) a 4U case for the massive CPU cooler and (2) a short-depth case that fits into my 18”/46cm deep server rack. For my AI workloads, I’m using an Nvidia RTX A4000. I was considering an AMD GPU, but while those have good Linux support, they generally have no to little Arm support since AMD has a competing CPU business to Arm. The 750W PSU is massively oversized (see power consumption further down), but I had it on hand.
The finished build looks like this:

Linux Installation
After connecting the IPMI networking port, you can access the OpenBMC dashboard. I like it a lot more than the SuperMicro IPMI dashboard from my older server. The default login that is used by OpenBMC out-of-the-box is:
- Username:
root - Password:
0penBmc(Key there is that the “O” in Open is actually the digit zero0)
Now let’s install Debian. For my old homelab server, I used Proxmox and VMs, but since I migrated all my self-hosted services to Docker Compose, I’m just going with bare-metal Debian this time. Also, Proxmox doesn’t officially support Arm CPUs (although there are community-supported ways).
Debian download:
- https://www.debian.org/distrib/netinst
- ARM64 image: https://cdimage.debian.org/debian-cd/current/arm64/iso-cd/debian-12.9.0-arm64-netinst.iso
You can directly mount the installation ISO image through the web browser in the IPMI which is very cool. In the OpenBMC dashboard, go to Operations -> Virtual Media and upload the image. Then reboot and boot from the “Linux File-Stor Gadget” disk.
Power Consumption
And now the big question, how much power does the system consume? I measured the power with a Kill A Watt at the wall outlet. I used the 10GbE port during all measurements, which presumably adds to the power consumption.
| Condition | GPU | RAM | Power Consumption |
|---|---|---|---|
| Idle | None | 4x 32GB | 54W |
| 100% CPU load (*) | None | 4x 32GB | 91W |
| Idle | Nvidia RTX A4000 | 4x 32GB | 68W |
| 100% CPU load (*) | Nvidia RTX A4000 | 4x 32GB | 100W |
| Base load (**) | Nvidia RTX A4000 | 6x 32GB | 86W |
| Base load (**) | Nvidia RTX A4000 | 8x 32GB | 101W |
(*) Load created using s-tui (stress-ng).
(**) Base load means all of my self-hosted services (a total of ~50 Docker containers) are deployed and running, but no active work is being done.
Power Take-Aways
- 54W for an Arm system might seem like a lot when compared to a Raspberry Pi. But for a 64 core CPU with 128GB of RAM, 10GbE networking, and PCIe 4.0 connectivity, I think that’s pretty good.
- The GPU idles at around 14W.
- Each stick of DDR4 RAM uses approximately 7.5W at idle, which I found surprising. I ended up reducing the amount of RAM in the server to reduce power consumption.
Arm Server Gotchas
Not all Docker containers are available for Arm CPUs, especially those with GPU features, which often lack an arm64
variant. If you want to move your server from an Intel or AMD processor to Arm, I recommend checking the Arm
compatibility of those projects first.
It is hard to find an OS to boot if you need a live Linux for debugging. I used the Ubuntu ARM64 for RPi. Most live Linux distros are AMD64 only.
Conclusion
While not cheap, this Arm server is very exciting, and I am very happy with it. As of the writing of this article, the server has been running great without any issues for 3 months. I can throw anything at this machine, and it gets processed quickly (e.g. reprocessing an entire Immich library with 30,000 photos in one night) with a moderate power draw. I am convinced that Arm servers are the future (especially in the home environment, see Apple or Nvidia’s DGX Spark) and I hope that there are more accessible options than this Ampere system coming to the market.